The last of the costume!
It was really helpful to see this You Tube tutorial on the vambraces, in order to make my version. I obviously didn’t do everything the same, but it gave me some up close visuals to work with on them.
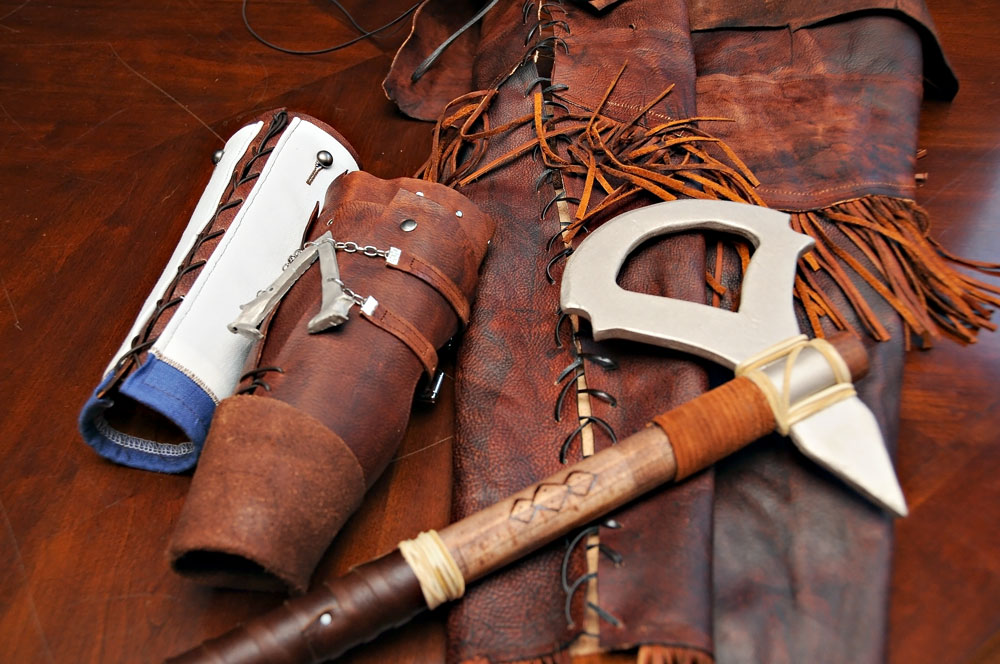
The size of the vambraces for the Boy were 7″ tall by 9″ at the top and 7″ at the bottom.
One of the vambraces has the fabric from the jacket over the top of it, and buttons on it. It has leather as a base.

I made holes in the leather and attached the buttons with wax thread. It makes them pretty solid.

The fabric was stitched over the top after the buttons were put on it.

I laced up the edge, so it can be adjusted to fit wider if needed.

All done with the easy one!

The next vambrace was a bit more of a challenge, and of course, I didn’t take any pictures while making it. Look at the tutorial I linked to above for some ideas on how to make it.

Here is what I did:
Cut out the leather pieces, and dyed them a brown color. There are three layers of leather plus the straps.

Attached the bottom layer with a rivet.
Attached the top layers with rivets at the top edge.
Sewed the straps on each side, after attaching a ribbon clamp to the edge.
Figured out how much chain was needed for the straps to attach to the symbol (made out of polymer clay). Attached with jump rings to the chain.
Used a hole punch for the holes, and sewed lacing on the front bottom of the top pieces to keep them together. Did the same for the back bottom.
Attached the buckles to the straps with rivets.
Attached some decorative rivets at the top.
All done!

The other leather pieces I made were:
– The faux moccasins/leg wraps. I cut 3 pieces for each, and it was approximately 23″ long, after the top was folded over. The fringe I bought separately and dyed it with the rest of the leather. I attached the 3 leather pieces and the fringe together with the sewing machine, and then I punched holes in the back and added the lacing.

– Belt on the outside waist of the jacket and the pouch. You can see that drying with the rest of the dyed leather on the picture above. The pouch is smallish and closes with a button knob. Pretty much just leather strapping riveted and sewed together for the rest.
– Belt around his waist with the symbol. You will be able to see this on the completed costume. It is just the symbol on a leather strap.
– Belts across his chest. These are supposed to hold his arrows, but I didn’t get that far. If he wears this next year, then he will get a bow and arrows. Only so much time! The leather pieces are done at least.
I used most of a hide on this project, so yeah…not a cheap costume at all. I figure I spent over $100 on it. I actually haven’t figured it all together, with the fabrics, leather, buttons, lacing, rivets, wood…it was a lot to buy. This is my hobby, though, and the looks on my kids’ faces when I can recreate these costumes are priceless. They get to be these fantasy characters, and how fun is that for a kid!
This is the reason I have a full time job…so I can afford my hobby. 😉
Now to finish up Malificent!


HOLY CRAP. I am seriously impressed with you.
YOU are my new hero.
Seriously cool.
Awww…thanks Michelle! 🙂
Such attention to detail, I can’t wait to see it all together when it’s modeled.
Thanks, Rachel! I try to do the best I can in getting things close. Sometimes I know I just can’t do certain things, but overall I give it my best shot. 🙂