My teenage daughter came to me less than 2 weeks before Halloween and wanted to replicate an outfit in a music video from one of the Korean bands she likes.
It was this jacket by R13, and is sold out. Not that she could buy it. It was around $900 retail.

This required going to the fabric store, and I wasn’t able to do that until last Saturday. She wanted to tag along to have final say over the fabric. I tried to tell her perfection was not going to be achieved here, but she was still in search of the perfect fabric.
Perfection was not achieved.
We purchased several different types of fabrics and after washing decided on the ones that I sewed up. We also purchased a duck cloth fabric and it matched better, but never really softened up enough for it to be comfortable. I’m sure I’ll use it…eventually.
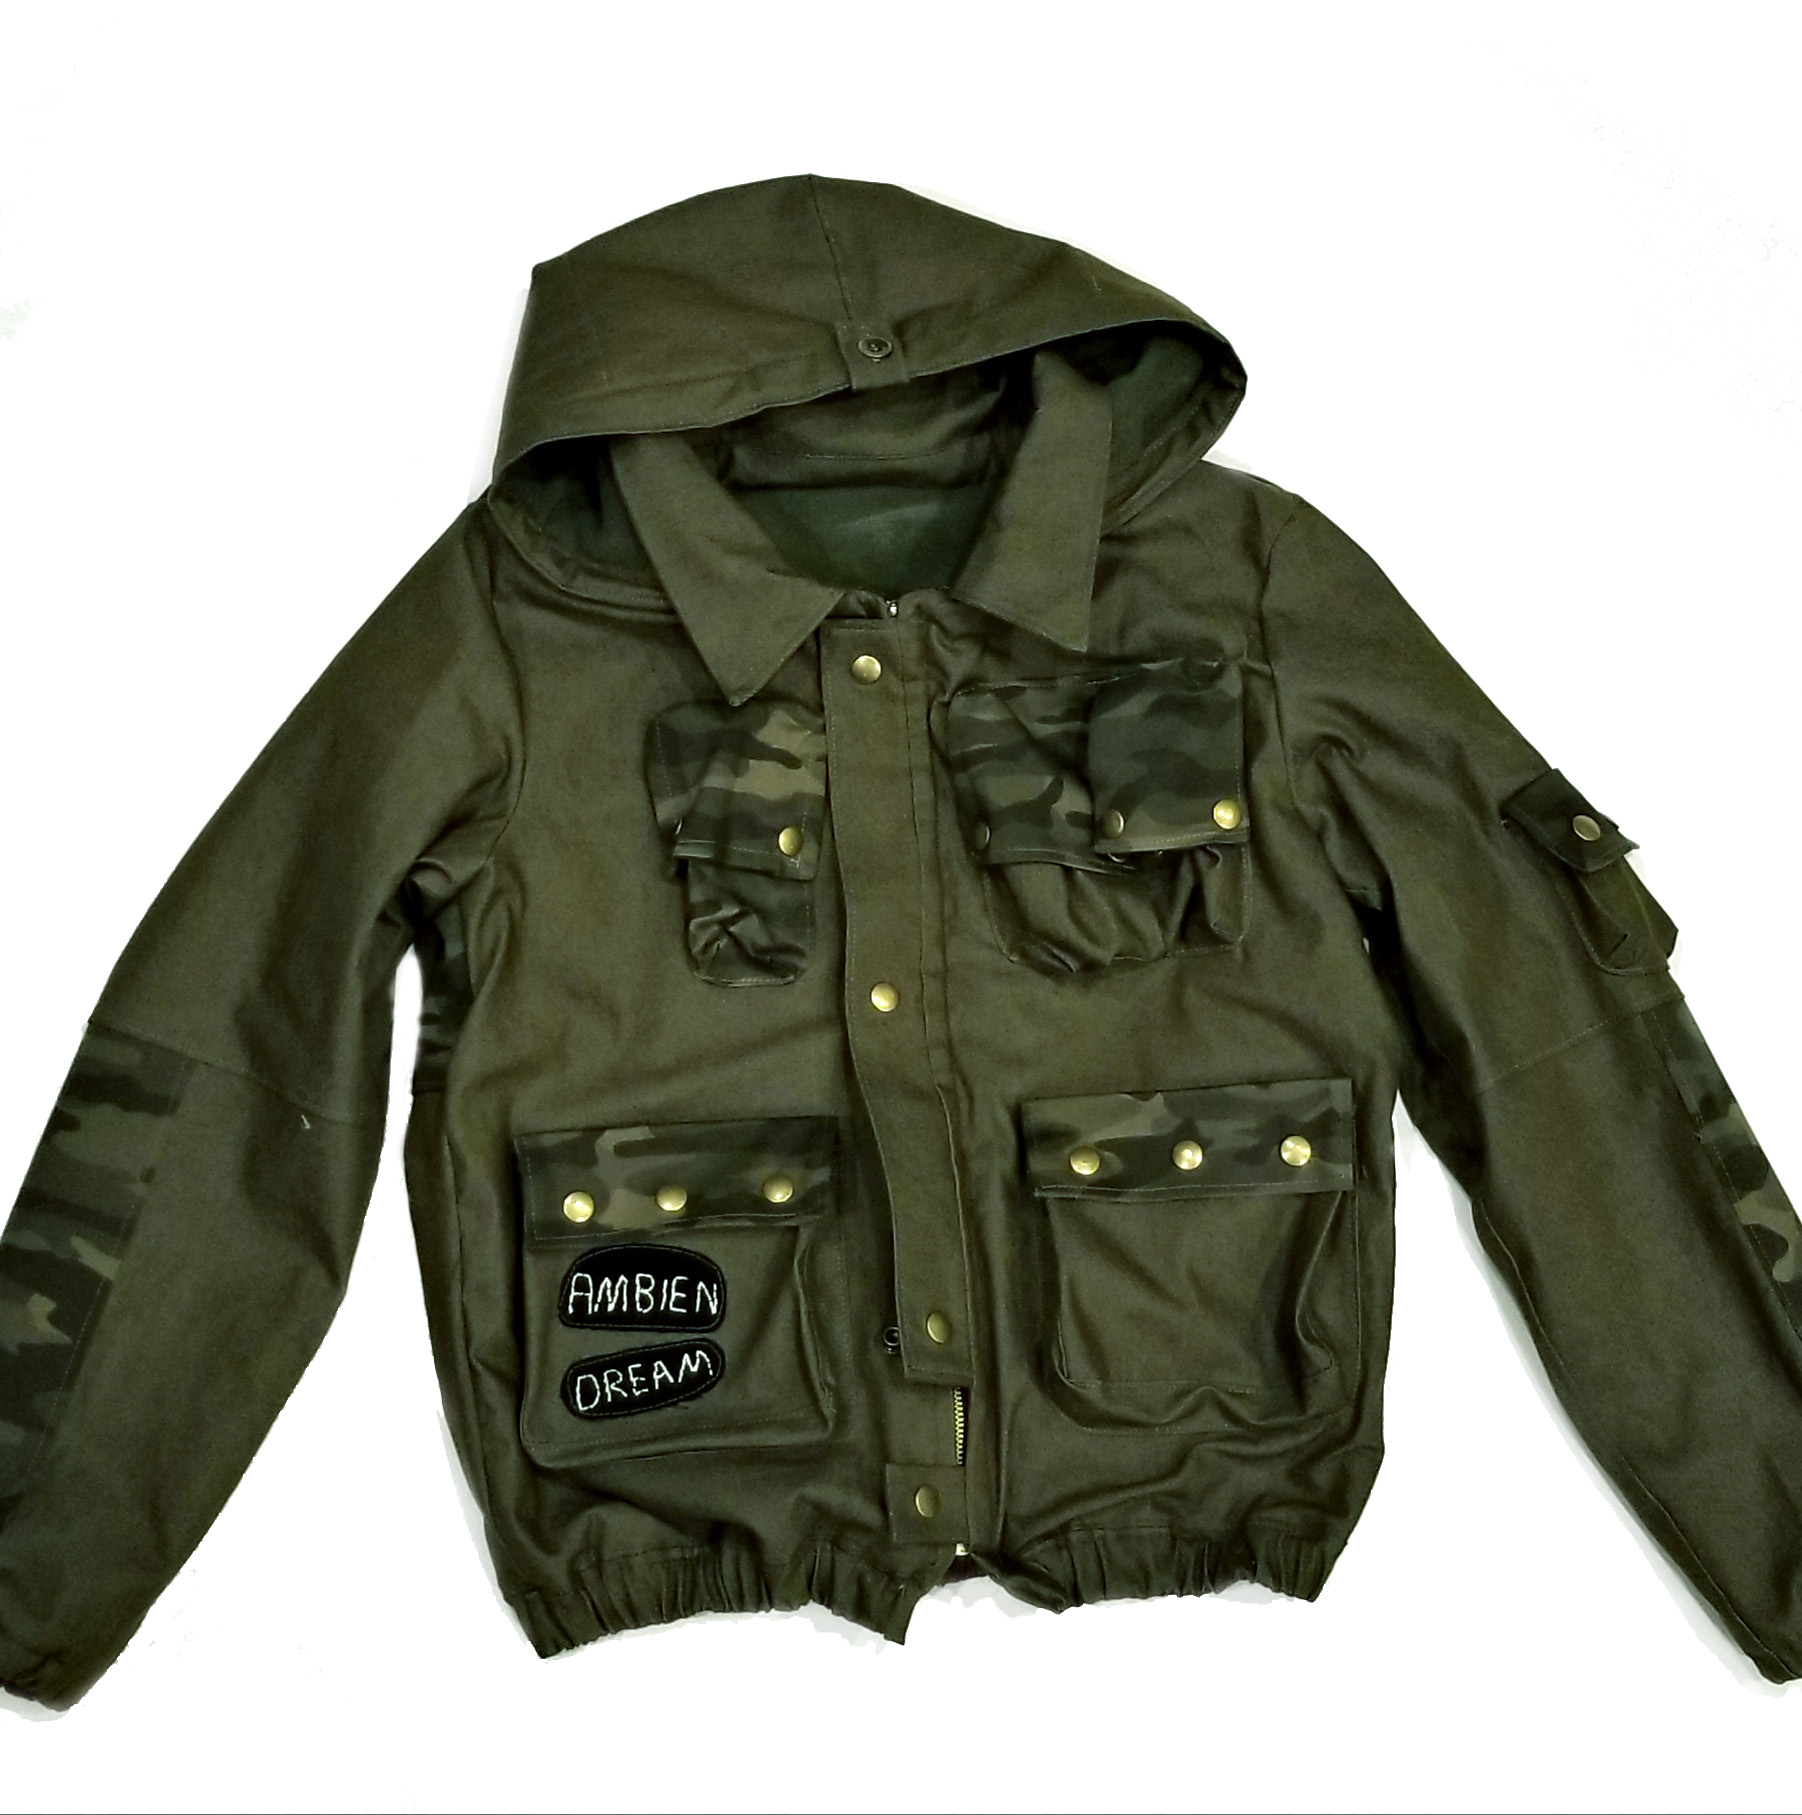
I drafted up the pattern on Sunday, using a bomber jacket by Wardrobe by Me as the basic block that I changed up. When I have to figure out a pattern for something like this, I generally choose something that is close and then start changing it up. With the pattern, I had to enlarge the arms and the armsyce, lengthen it, draft the collars, I modified a hood from another pattern, drafted a placket, and drafted all the pockets.
There were a lot of pieces with all those pockets. I also decided to line it with a fleece, so it would be like an actual jacket and be warm to wear. I ended up having to add a gusset on the outer arm, since the fleece ended up taking too much space and made it tight.

We got 7″ of snow last week. Warmth may be really needed this winter.
So. Many. Pockets. I should have made most of the pockets a bit deeper and bigger, but again…I was just going from a picture and guesstimating at the sizing. I wasn’t going to recut everything, since time was not on my side.
The jacket also had a bit of embroidery. This was fairly easy embroidery. I kept off the R13, since that was a logo and I don’t want a complete counterfeit.

There were A LOT of post snaps on this jacket. Each of the pockets had at least 2, up to 4, snaps, plus the snaps down the front and on the collar. I have all the tools to put on the snaps, and they still tend to not go on the best. I use Tandy snaps and need to find another type. They are durable, and probably good for leather since you don’t need to pound them down so far, but on fabric you have to do a lot of pounding to get them set. Sometimes they go offset or just get warped from that. On the pockets where the fabric was thinner, I backed them with scrap squares of leather so they wouldn’t tear out of the fabric.


It also has some paint spots on it and distressing. I have a Dremel with a sander on it, so that was my solution for the distressing. I set the girl on going at it with the Dremel so she had some skin in the game. I did stay up until 1am to finish it on Wednesday night. Sorry these pictures are pre-distressing. She got the sanding done and then started wearing it. I guess it was successful??
The hard part was just trying to get all the details on this jacket. There is a ton of little details, which is a what drives the price tag, too. Details take time in making a garment, so when you see something with a ton of details and a high price tag…that is why. I left off a few things. There were little tabs with a metal square piece on them. I did have some metal square pieces that would work, but in the end I didn’t get them in the seam in time and didn’t have the energy to seam rip.


The hardest part in these projects is not forgetting to do parts before sewing. I forgot to put in a end channel piece on the hood (like a buttonhole or grommet) and I figured if she complained I would hand-sew a round button hole. I was running low on time and fumes, plus my machine needs to be serviced and my back started really bothering me.
Only so much a momma can do.
Don’t stress, Do your best, and Forget the rest.
In the end the frustrating parts were just putting the lining, collar, hood and outer together, on top of the zipper and placket not quite being the right width on each side.


What I would change in my drafting and construction:
- Make the pockets bigger.
- Add in the hood channel openings and the drawstring.
- Change the zipper placket area and make the overlap wider.
- Add a woven piece over the top of the fleece at the neckline so it didn’t and wouldn’t stretch so much.
- Make it longer.


Not bad for a first (and only, may I add) draft and pattern hack.
I also made a green t-shirt to complete the outfit from the video.


Stacy, this is amazing! I’m so impressed with all of this detail! 😍😍😍😍😍😍😍
Thank you, Abbey! I tried to get as many details as I could. She washed it after she did the distressing and it looks even better for that “worn” look and is extremely happy with it. That makes it all worthwhile!